m (rm signing (already shown in history)) |
m (Cleanup) |
||
| Line 1: | Line 1: | ||
{{Header Nav|game=Combat Arms}} | {{Header Nav|game=Combat Arms}} | ||
Cold Seed is the second smallest map in Combat Arms. It consists of a snowy outdoor area, several buildings, and a system of upper hallways. | Cold Seed is the second smallest map in Combat Arms. It consists of a snowy outdoor area, several buildings, and a system of upper hallways. | ||
| Line 6: | Line 5: | ||
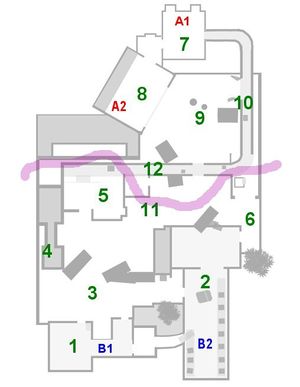
Below is a map of Cold Seed with the spawn points for Alpha and Bravo teams labeled in red and blue. Special locations and features in the map are noted. These features are numbered in green and detailed below. The semi-transparent purple line shows the split of "area possession" by Alpha and Bravo teams. Bravo team has control over areas below the purple, Alpha team has control over areas above it. Notice that Bravo's territory is larger than Alpha's, as is in many maps, but this makes it easier for Alpha team to invade and rush enemy bases. | Below is a map of Cold Seed with the spawn points for Alpha and Bravo teams labeled in red and blue. Special locations and features in the map are noted. These features are numbered in green and detailed below. The semi-transparent purple line shows the split of "area possession" by Alpha and Bravo teams. Bravo team has control over areas below the purple, Alpha team has control over areas above it. Notice that Bravo's territory is larger than Alpha's, as is in many maps, but this makes it easier for Alpha team to invade and rush enemy bases. | ||
[[Image:CA_coldseed-map.jpg| | [[Image:CA_coldseed-map.jpg|thumb|right|Map of Cold Seed.]] | ||
==Alpha Team== | ==Alpha Team== | ||
===(7) Alpha Spawnhouse=== | ===(7) Alpha Spawnhouse=== | ||
This is Alpha's main spawn point. This spawn location has two side exits to the left and the right. | |||
Taking the left will lead you into the garage (A2) and from there out into the Alpha field. This exit is usually the most used in smaller games, as you have less threat of ambush. This is also a primary spot for Snipers on Alpha, in bigger matches, because of the cover provided by the tank. | |||
However, taking the right path will lead you up the inclined ramp into neutral territory. Taking this path is more dangerous, as Alpha has a height disadvantage, and Bravo can hide either at the top of the path, or crouch behind the metal (non-breakable) crate halfway along the path. This is very cramped, and has almost no cover in it. It is not recommended in large (5v5 or larger) matches. | |||
===(8) Garage Base=== | ===(8) Garage Base=== | ||
{{sect-stub}} | |||
===(9) Alpha Field=== | ===(9) Alpha Field=== | ||
{{sect-stub}} | |||
===(10) Vertical Hall=== | ===(10) Vertical Hall=== | ||
{{sect-stub}} | |||
==Bravo Team== | ==Bravo Team== | ||
===(1) Bravo Spawnhouse=== | ===(1) Bravo Spawnhouse=== | ||
{{sect-stub}} | |||
===(2) Warehouse Base=== | ===(2) Warehouse Base=== | ||
{{sect-stub}} | |||
===(3) Bravo Field=== | ===(3) Bravo Field=== | ||
{{sect-stub}} | |||
===(4) Small Building=== | ===(4) Small Building=== | ||
{{sect-stub}} | |||
===(5) Boiler Room=== | ===(5) Boiler Room=== | ||
{{sect-stub}} | |||
===(6) Side Alley=== | ===(6) Side Alley=== | ||
{{sect-stub}} | |||
==Ambiguous Possession== | ==Ambiguous Possession== | ||
===(11) Center Field=== | ===(11) Center Field=== | ||
Not a very used area because of Campers along the Horizontal hallway. | Not a very used area because of Campers along the Horizontal hallway. | ||
===(12) Horizontal Hall=== | ===(12) Horizontal Hall=== | ||
{{sect-stub}} | |||
==Capture the Flag== | ==Capture the Flag== | ||
{{sect-stub}} | |||
{{Footer Nav|game=Combat Arms|prevpage=Snow Valley|nextpage=Gray Hammer}} | {{Footer Nav|game=Combat Arms|prevpage=Snow Valley|nextpage=Gray Hammer}} | ||
Revision as of 10:53, 27 June 2009
Cold Seed is the second smallest map in Combat Arms. It consists of a snowy outdoor area, several buildings, and a system of upper hallways.
Below is a map of Cold Seed with the spawn points for Alpha and Bravo teams labeled in red and blue. Special locations and features in the map are noted. These features are numbered in green and detailed below. The semi-transparent purple line shows the split of "area possession" by Alpha and Bravo teams. Bravo team has control over areas below the purple, Alpha team has control over areas above it. Notice that Bravo's territory is larger than Alpha's, as is in many maps, but this makes it easier for Alpha team to invade and rush enemy bases.

Alpha Team
(7) Alpha Spawnhouse
This is Alpha's main spawn point. This spawn location has two side exits to the left and the right.
Taking the left will lead you into the garage (A2) and from there out into the Alpha field. This exit is usually the most used in smaller games, as you have less threat of ambush. This is also a primary spot for Snipers on Alpha, in bigger matches, because of the cover provided by the tank.
However, taking the right path will lead you up the inclined ramp into neutral territory. Taking this path is more dangerous, as Alpha has a height disadvantage, and Bravo can hide either at the top of the path, or crouch behind the metal (non-breakable) crate halfway along the path. This is very cramped, and has almost no cover in it. It is not recommended in large (5v5 or larger) matches.
(8) Garage Base
(9) Alpha Field
(10) Vertical Hall
Bravo Team
(1) Bravo Spawnhouse
(2) Warehouse Base
(3) Bravo Field
(4) Small Building
(5) Boiler Room
(6) Side Alley
Ambiguous Possession
(11) Center Field
Not a very used area because of Campers along the Horizontal hallway.